Index of Contents
- Quick Start
- How does it work
- Send order email manually
- Set prices format
- Override email & pdf templates in child-theme
- Translations
- How to create suppliers
- Settings options panel
- Using custom labels
- Native WooCommerce import / export
- Send emails via SMTP
- Include delivery date
- Extra fields for suppliers
- Hooks
Quick start
View Youtube mini-tutorial (Opens in other tab)
1.1 Create new suppliers in Products / Suppliers

1.2 Select the supplier of the products when editing each one in a new selection box "Suppliers" that appears.

1.3 Set your preferences in Supplier Order Email Settings page.


1.4 When an order changes to "Processing" status, an automatic order email is sent to the supplier to send the corresponding products to the customer.

2. How does it work
The plugin creates a new taxonomy (Suppliers) and a new selection box on each product. When an order changes to "Processing" status, the plugin sends an email to the supplier of each product in the order. The email contains the list of products that the supplier must send to the customer.
3. Send order emails manually
If the envelope button doesn’t appear, click "Screen Options" in the top right and activate the "actions" checkbox.

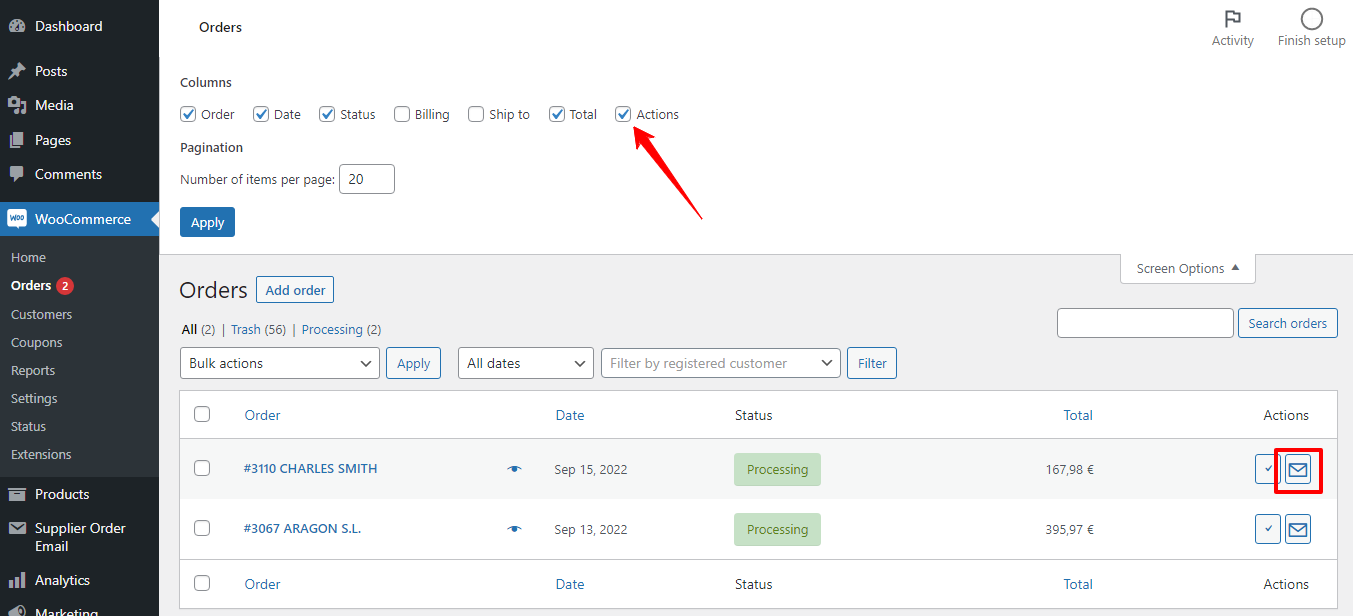
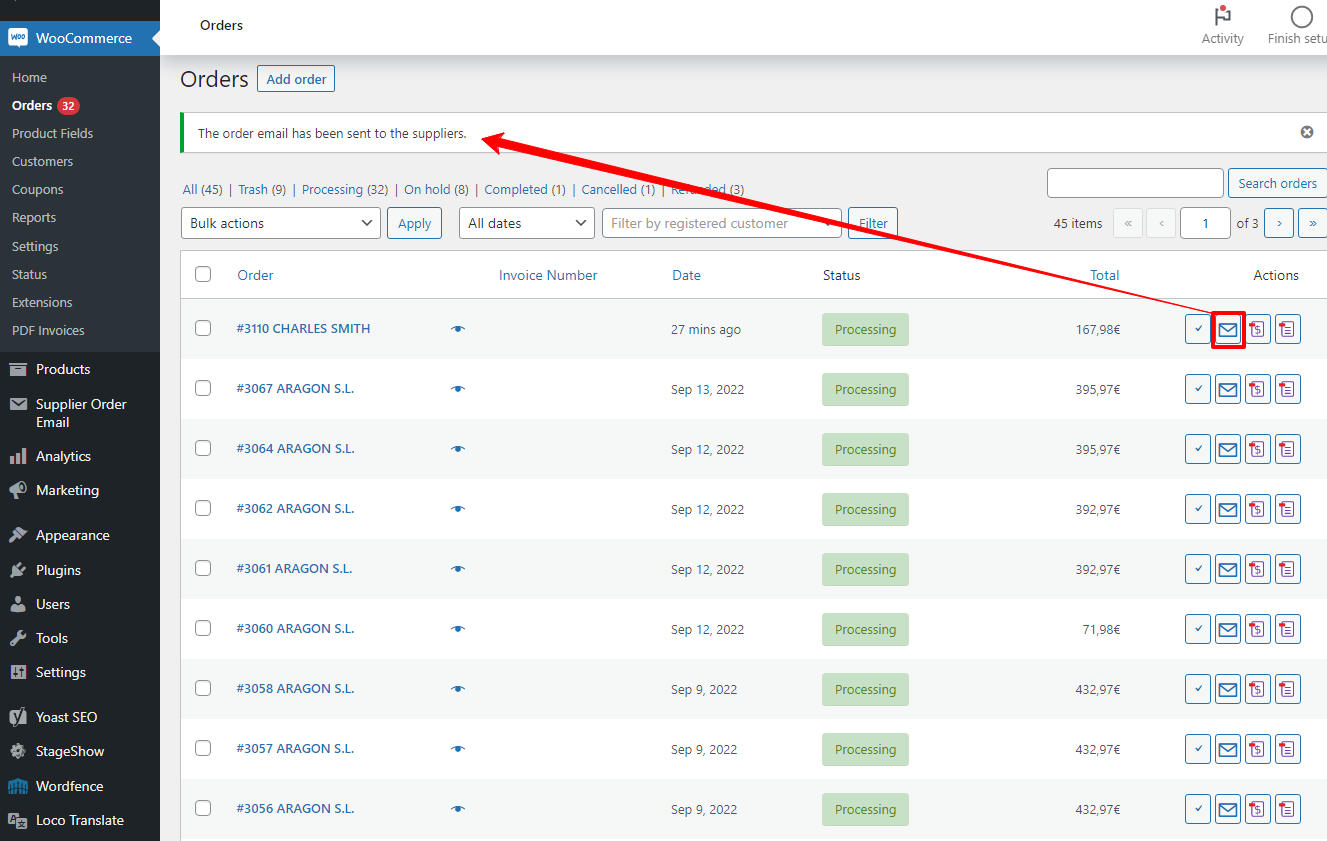
You can send order emails manually from the Orders page to suppliers. Click the envelope button that appears to the right of the line item.
4. Set prices format
The prices in the email are formatted according to the settings in WooCommerce / Settings / General.
The plugin adapts to the currency symbol, position, thousand separator, decimal separator, and number of decimal places that have been defined for WooCommerce.
5. Override email & pdf templates in child-theme
The plugin includes templates to code the emails and pdf documents that are sent to suppliers. In the Premium version, you can override these templates by duplicating the following files in "wp-content/themes/yourchildtheme/supplier-order-email/…" for deeper customization.
The templates for html emails are in the "yourdomain/wp-content/plugins/supplier-order-email/includes/email/email-template-parts" folder and are the following files:
- mcisoe_email_header.php
- mcisoe_email_customer_data.php
- mcisoe_email_footer.php
- mcisoe_table_header.php
- mcisoe_table_content.php
- mcisoe_email_totals.php
The templates for pdf documents are in the "yourdomain/wp-content/plugins/supplier-order-email/includes/email/pdf-template-parts" folder and are the following files:
- mcisoe_pdf_header.php
- mcisoe_pdf_customer_data.php
- mcisoe_pdf_footer.php
- mcisoe_pdf_table_header.php
- mcisoe_pdf_table_content.php
- mcisoe_pdf_totals.php
The CSS styles of the emails are written in the templates in the html.
The CSS styles of the pdf documents are in the file:
- /wp-content/plugins/supplier-order-email/pdf/css/pdf_styles.css
To modify the styles you must copy this file and paste it in your child theme in:
- /wp-content/themes/child_theme/supplier-order-email/pdf_styles.css". Modifications you make will not be lost with updates.
If you have basic knowledge of php/html you can copy one or all of the original files, paste them into your child theme and modify them. So your modifications will be permanent even if you update the plugin.
Here is an example of the steps to overwrite the customer data template and change their address data to their first and last name:
-
Create the supplier-order-email folder inside the child-theme folder.
-
Inside that folder create a file mcisoe_email_customer_data.php
-
Copy the code that is in this link and you are ready to show the name and surname of the customer: https://github.com/mcidesarrollo/supplier_order_email_template_example/blob/master/mcisoe_email_customer_data.php
-
Paste the code into the child theme’s mcisoe_email_customer_data.php file.
If you don’t know how to do it, we can do it for you. Send us an email to info@mci-desarrollo.es with information about what you need and we will send you a custom quote.
6. Translations:
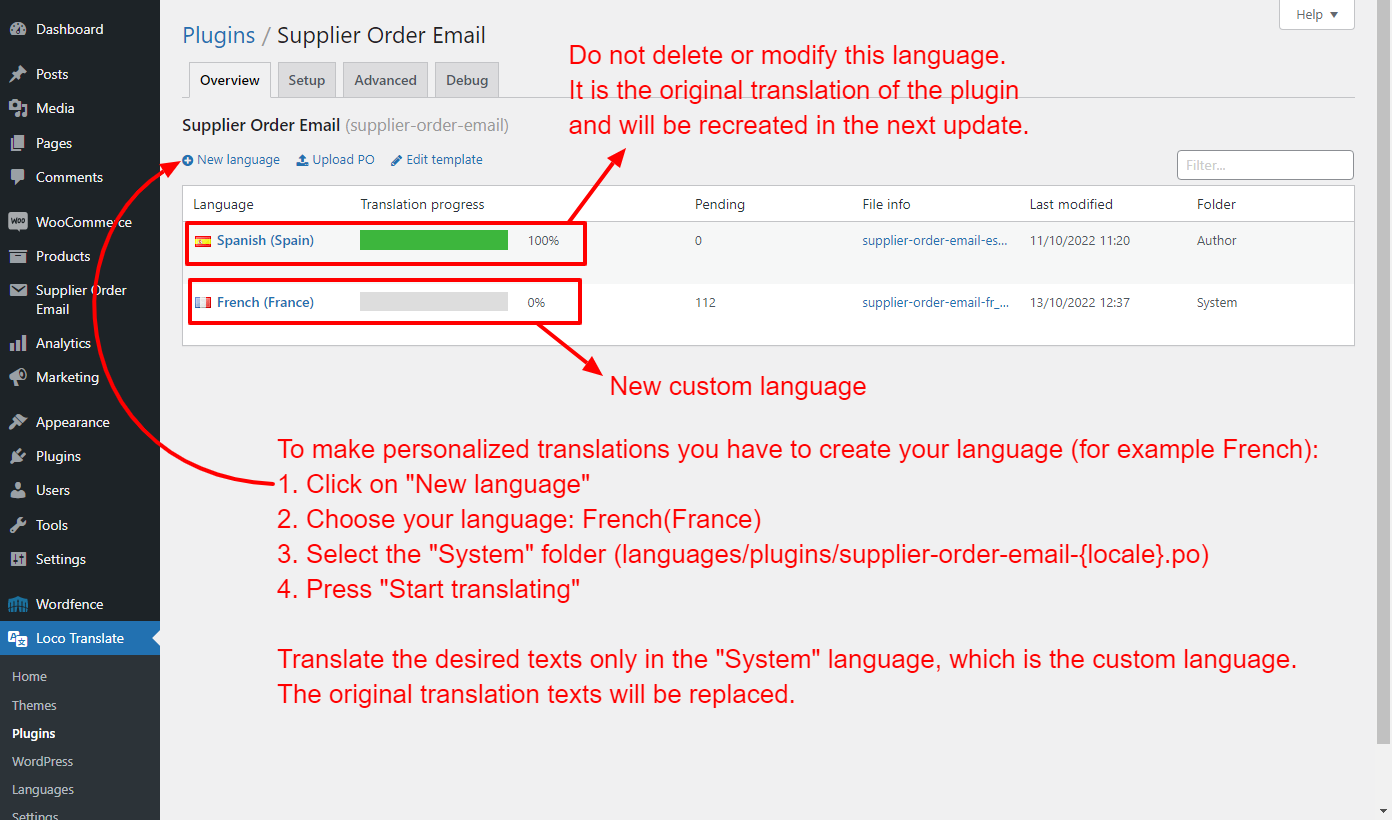
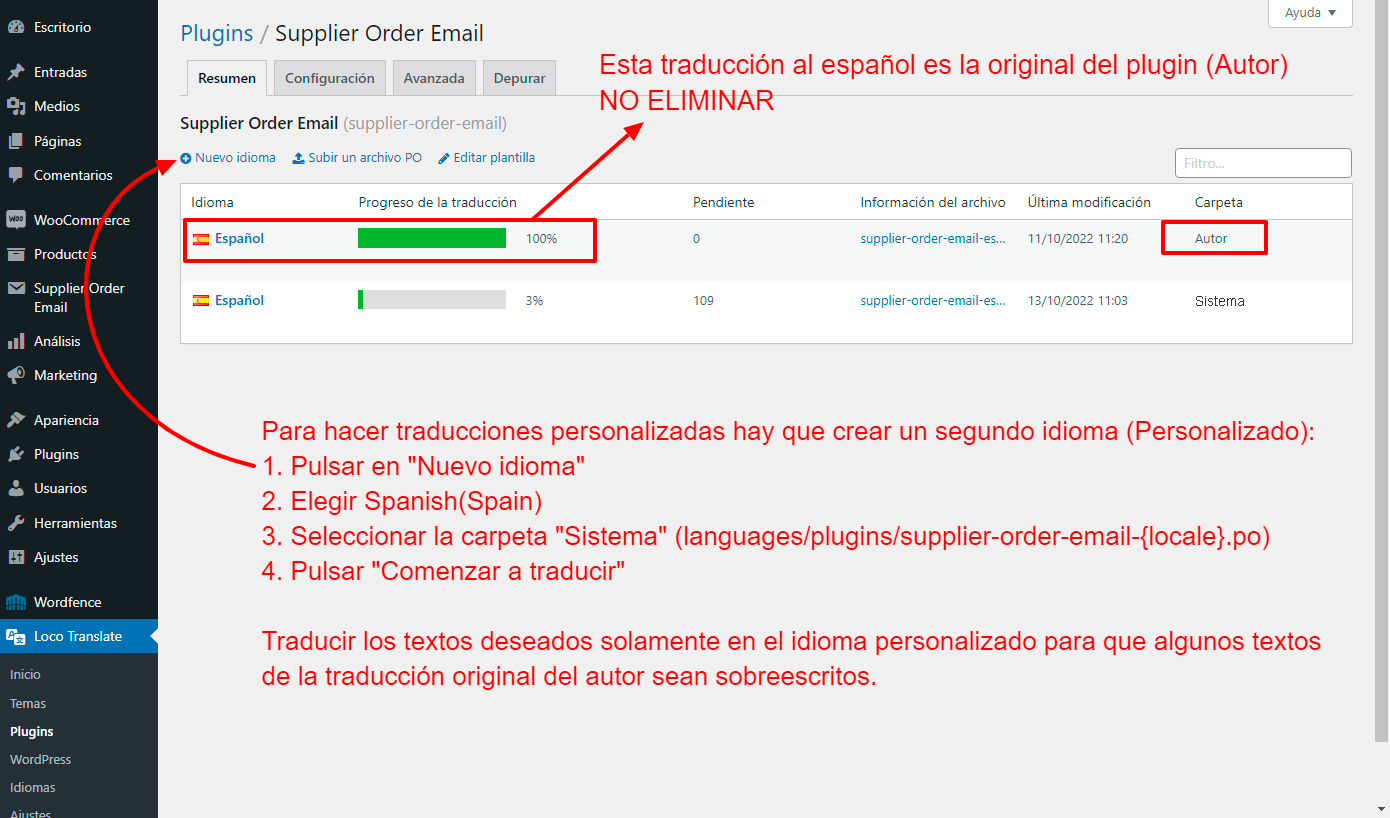
The plugin is available in English and Spanish. The texts can be translated into other languages using a plugin like "Loco Translate".
6.1 For all languages (except Spanish):
6.2 For Spanish language:
7. How to create suppliers
- Go to "Products / Suppliers".
- Type the name and email of the supplier.
- Write a custom text for this supplier if you want to use it later in the subject of the email or in the introductory text with the tag {supplier_custom_text}.
- Click "New supplier".
Unlimited providers can be created.
8. Settings options panel
-
Email subject
The subject of the email that is sent to the suppliers.
- If use {order_number} in the subject, it will be replaced by the order number.
- If use {order_date} in the subject, it will be replaced by the order date in your WordPress selected format.
- If use {supplier_custom_text} in the subject, it will be replaced by the custom text of the corresponding supplier.
-
Email introductory text
The introductory text of the email that is sent to the suppliers. That appears after of header.
- If use {order_number} in the introductory text, it will be replaced by the order number.
- If use {order_date} in the introductory text, it will be replaced by the order date in your WordPress selected format.
- If use {supplier_custom_text} in the introductory text, it will be replaced by the custom text of the corresponding supplier.
-
Send copy of emails to admin:
If you activate this option, a copy of the emails sent to suppliers will be sent to the WordPress admin specified in Settings/General.
In the field below you can specify the email where the copies of the orders that are sent to the suppliers are received. (If you do not fill in this field, the emails will be received in the WordPress admin email).
-
Turn off ALL automatic email sending:
If you check this box, the automatic sending of all emails to suppliers will be deactivated. You will still be able to send emails manually from the WooCommerce order list page by clicking the envelope icon (explained in point 3 of this manual).
-
Email sender for "From" and "Reply-To" labels
You can change the sender of the emails that are sent to the suppliers. By default it is the WordPress admin email.
Please, use an email that is registered in your domain. If you use a Gmail or Hotmail email, the emails may be marked as spam by mail servers.
-
Use the customer´s billing address if the order does not have a shipping address
If you activate this option, the customer’s billing address will be used if the order does not have a shipping address.
-
Delete all data when uninstall the plugin
If you activate this option, all options will be deleted when you uninstall it.
-
Headers color
You can change the color of the email headers. By default it is blue.
-
Show store logo instead of header text
If you activate this option, the store logo will be shown instead of the header text in emails.
The logo is the custom logo defined in Customize/Site Identity.
In the plugin template, the logo has a maximum width of 300px defined. If you need to change it, you can do so by overriding the mcisoe_email_header.php template.
-
Show order number
If you activate this option, the order number will be shown in the emails.
The order number can also be displayed in the subject or introductory text of the email using the {order_number} tag.
-
Show customer email
If you activate this option, the customer email will be shown in the emails.
-
Show customer phone
If you activate this option, the customer phone will be shown in the emails.
-
Show customer notes
If you activate this option, the customer notes will be shown in the emails.
-
Show total price
If you activate this option, the total price will be shown in the emails.
-
Show payment method
If you activate this option, the payment method will be shown in the emails.
-
Show shipping method
If you activate this option, the shipping method will be shown in the emails.
-
Hide all customer data
If you activate this option, all customer data will be hidden in the emails.
-
Attach PDF document
If you activate this option, a PDF file will be attached to the email with the order details.
-
Store pdf file in WordPress uploads folder
If you activate this option, the PDF file will be stored in the WordPress uploads folder as /wp-content/uploads/supplier-order-email/pdf-files/0001_Supplier.pdf
The pdf files will remain in this folder as long as you don’t delete them. They will only be deleted if you do it manually or if you uninstall the plugin by first checking the box "Delete all data & pdf documents when uninstall the plugin".
-
Show Product Image
If you activate this option, the image of each product will be shown in the emails.
The image size adapts to the width of the table according to the screen size and you can also set a maximum width for the images by filling in the "Max. image width (pixels)" field. If you don’t fill it in, the default maximum width is 100 pixels.
-
Show Short description
If you activate this option, the short description of the products will be shown in the emails.
-
Show Price
If you activate this option, the price of each product will be shown in the emails.
-
Show Weight
If you activate this option, the weight of each product will be shown in the emails.
-
Show EAN number
If you activate this option, the EAN numbers of each product will be shown in the emails.
For that you must have installed the "EAN for WooCommerce" plugin (from WPFactory) which is compatible with "Supplier Order Email". This plugin saves the EAN in a custom product meta field called "_alg_ean".
The "EAN for WooCommerce" plugin allows you to import EANs that you saved with other plugins if you know the name of the custom meta field used by the old plugin.
You can also use the EAN for emails to suppliers if you have created it with code in your functions.php or a snippet. In that case you can use the name "_wpm_gtin_code" to create that snippet and "Supplier Order Email" will identify it.
-
Show Attributes
If you activate this option, the attributes of each product will be shown in the emails.
-
Show Variations and meta custom fields
If you activate this option, the variations and formatted meta custom fields of each product will be shown in the emails.
If you want show some specific meta custom fields, you can add them in the field below.
Type one or more custom meta fields separated by commas to display in product row. These custom meta fields must exist in the product item and the keyword must be exactly the same as the one you have defined in the product (included capital letters, spaces and and underscores "_").
-
Show cost of each product
This option only appears if you have the plugin "WooCommerce Cost of Goods" installed and activated.
If you activate this option, the cost of each product will be shown in the emails.
-
Show total cost
This option only appears if you have the plugin "WooCommerce Cost of Goods" installed and activated.
If you activate this option, the total cost will be shown in the emails.
9. How to use custom labels
You can use custom labels in the email subject and introductory text. To do this, you must use the following tags:
- {order_number}
- {order_date}
- {supplier_name}
- {supplier_custom_text}

10. Native WooCommerce import / export
The plugin includes native WooCommerce import / export compatibility for assign the suppliers of your products from a CSV file.
To set the supplier you must indicate the id of the supplier in the "supplier" column of the products csv file.
You can see more details about the import/export of products in WooCommerce in this link to WooCommerce Documentation

There are also plugins with more features to import/export products like WP All Import and others.
11. Send emails via SMTP
The html of the emails generated by our plugin are fully optimized to be friendly to antispam filters.
There are many reasons why WP emails can enter the spam folder that are unrelated to the plugin: IP or domain on a blacklist, sender different from the email you send, content and subject of the message, quantity and frequency of emails. ..
We always recommend sending all WordPress emails via SMTP and not using the generic way. Mail platforms rely more on that and many times you will avoid your emails ending up in the spam folder.
-
One of the best free plugins for this is "Post SMTP Mailer/Email Log – Best Mail SMTP For WP".
-
You can also use "Mailgun for WordPress" and many other SMTP sending plugins for WordPress.
12. Include Delivery date
If you are using the plugin "Order Delivery Date for WooCommerce", the order delivery date will automatically appear in each supplier’s order emails. Our Plugin is compatible.
If you collect the delivery date through an order custom field, it will only be shown in the order to suppliers if the custom field is named "_delivery_date".
13. Extra fields for suppliers
You can write a custom text when you create or modify a supplier. This {supplier_custom_text} can be used in the subject and the introductory text of the email and is unique for each supplier.
You can also create a Supplier data text when you create or modify a supplier. This text will be displayed in the pdf document under the logo.
14. Hooks
You can use the following hooks to modify the plugin’s behavior:
-
add_filter( ‘mcisoe_payment_method’, ‘mcisoe_replace_payment_method’, 10, 2 );
This filter allows you to modify the payment method before it reaches the email and pdf templates.
Receives 2 parameters: $payment_method, $order
-
add_filter( ‘mcisoe_shipping_method’, ‘mcisoe_replace_shipping_method’, 10, 2 );
This filter allows you to modify the shipping method before it reaches the email and pdf templates.
Receives 2 parameters: $shipping_method, $order
-
add_filter( ‘mcisoe_email_customer_data’, ‘mcisoe_replace_customer_data’, 10, 2 );
This filter allows you to modify the customer’s shipping data in the email that is sent to the suppliers.
Receives 2 parameters: $customer_data, $order
-
add_filter( ‘mcisoe_pdf_customer_data’, ‘mcisoe_replace_customer_data’, 10, 2 );
This filter allows you to modify the customer’s shipping data in the pdf document that is sent to the suppliers.
Receives 2 parameters: $customer_data, $order
-
add_filter( ‘mcisoe_email_subject’, ‘mcisoe_replace_email_subject’, 10, 3 );
This filter allows you to modify the email subject before it reaches the email template.
Receives 3 parameters: $email_subject, $order_number, $wp_supplier
-
add_filter( ‘mcisoe_send_email_manually’ , ‘mcisoe_send_emails’, 10, 1);
This filter allows you to trigger the sending of emails to suppliers if it receives a true value.
Receives 1 parameter: $order_id
This filter allows you to trigger the sending of emails to suppliers if it receives a true value. The filter is executed inside the ‘woocommerce_process_shop_order_meta’ hook that is triggered when the update button on the order edition page is pressed.
-
add_filter( ‘mcisoe_product_name’, 10, 2 );
This filter allows you to modify the product name before it reaches the email and pdf templates.
Receives 2 parameters: $product_name, $item
-
add_filter( ‘mcisoe_product_meta’, 10, 2 );
This filter allows you to modify the product meta data before it reaches the email and pdf templates.
Receives 2 parameters: $meta_data, $item
-
add_filter( ‘mcisoe_product_below_meta’, 10, 2 );
This filter allows you to modify the content below meta data before it reaches the email and pdf templates.
Receives 2 parameters: $meta_items, $item
-
add_filter( ‘mcisoe_special_meta_array’, ‘mcisoe_filter_special_meta’, 10, 2 );
This filter allows filter the special meta fields.
Receives 2 parameters: $special_meta_array, $order_item
-
add_filter( ‘mcisoe_email_attachments’, ‘mcisoe_add_files’, 10, 3 );
This filter allows you to add files to the email attachments.
Receives 3 parameters: $attachments, $order_id, $wp_supplier_name
-
add_filter( ‘send_emails_to_all_suppliers’, ‘__return_true’ );
This filter allows you to send emails to all marked suppliers of each product (primary and secondary) if plugin "Yoast SEO" is installed and activated. By default, the plugin only sends emails to primary suppliers.
All rights reserved. © 2022 MCI Desarrollo